
Router Guide Bushings: A Comprehensive Guide
Router guide bushings offer precision for various woodworking tasks, enabling complex cuts and repeatable accuracy, especially when paired with templates and specialized router bits.
What are Router Guide Bushings?
Router guide bushings are precision tools that attach to your router, allowing the router bit to follow a template with exceptional accuracy. Unlike bearing bits which rely on the bit’s own diameter for guidance, bushings utilize an inner diameter to guide the bit along the template’s edge.
These bushings are typically made of hardened steel and come in various sizes, each offering a different offset distance between the template and the bit. This offset is crucial for achieving the desired final shape and size of your workpiece. They are incredibly versatile, enabling complex pickup routs, shallow recesses, and intricate inlay work, offering capabilities beyond standard bearing-guided bits.
The Core Principle: Offset Routing
Offset routing is the fundamental concept behind using router guide bushings. Because the bushing runs alongside the template, the router bit doesn’t cut directly on the template’s line. Instead, it cuts a parallel path, offset by the difference between the bushing’s inner diameter and the router bit’s diameter.
This offset requires careful calculation to ensure the final cut matches the intended design. Understanding this offset is key; bearing bits cut directly to the template size, simplifying the process, but bushings offer greater control and versatility. Accurate template creation and precise bushing selection are vital for successful offset routing, allowing for intricate and repeatable results.
Types of Router Guide Bushings
Router guide bushings come in several varieties, each suited for different applications. Solid bushings are the most basic, offering a fixed offset and are generally the most affordable option. Adjustable bushings feature an inner sleeve that allows you to modify the offset, providing flexibility for varying bit sizes and design needs.
Self-centering bushings incorporate a mechanism to automatically center the bushing within a pre-drilled hole, simplifying setup for tasks like hinge mortises. The choice depends on project complexity and budget. Adjustable bushings offer versatility, while solid bushings excel in repetitive tasks requiring a consistent offset. Selecting the right type enhances precision and efficiency.
Solid Bushings
Solid router guide bushings represent the simplest and often most economical choice for guided routing. These bushings feature a fixed inner diameter, determining the offset distance between the bit and the template edge. They are typically constructed from hardened steel, ensuring durability and resistance to wear during prolonged use.
Their straightforward design makes them ideal for repetitive tasks where a consistent offset is crucial, like creating identical parts or following a fixed pattern. While lacking the adjustability of other types, solid bushings provide reliable performance and are a great starting point for woodworkers exploring guided routing techniques. They are a foundational tool for precision woodworking.
Adjustable Bushings
Adjustable router guide bushings offer enhanced versatility compared to their solid counterparts. These bushings incorporate a mechanism allowing you to modify the inner diameter, effectively changing the offset distance between the router bit and the template. This adjustability is invaluable when working with varying template thicknesses or when needing to accommodate different bit sizes.
The ability to fine-tune the offset eliminates the need for multiple fixed bushings, streamlining your workflow and reducing tool clutter. They are particularly useful for projects requiring incremental adjustments or when adapting to existing templates. While generally more expensive than solid bushings, the added flexibility makes them a worthwhile investment for serious woodworkers.
Self-Centering Bushings
Self-centering router guide bushings represent a specialized solution for specific routing applications, primarily focused on achieving precise centering of the cut relative to the template. These bushings typically feature a design that automatically aligns the bushing within the template opening, minimizing the potential for off-center routing.
This is particularly beneficial when creating features like rosette patterns or accurately positioned holes. While not as universally applicable as solid or adjustable bushings, self-centering designs excel in situations demanding absolute concentricity. They often require templates with precisely sized openings to function correctly, and their use cases are somewhat niche, but the results can be exceptionally accurate when applied appropriately.

Applications of Router Guide Bushings
Router guide bushings excel in pickup routing for guitars, creating precise recesses for hardware, detailed inlay work, and crafting professional-quality signs with specialized bits.
Pickup Routing in Guitar Making
Router guide bushings are invaluable for achieving precise and consistent pickup routs in guitar building. They allow for complex shapes to be cut in a single pass, something often difficult with other methods. Utilizing a template and the appropriate bushing size ensures accurate placement and depth for various pickup types.
The stability offered by a bushing system minimizes tear-out and provides clean edges, crucial for a professional finish. This is particularly important when working with delicate tonewoods. Guide bushings enable luthiers to replicate pickup cavities with exceptional accuracy across multiple instruments, streamlining the production process and guaranteeing consistent results. They are a capable and inexpensive upgrade for guitar making.
Creating Shallow Recesses for Hardware
Router guide bushings excel at creating shallow, precise recesses for mounting hardware like bridges, plates, and control knobs on instruments or woodworking projects. This method ensures a flush fit and professional appearance, avoiding the need for extensive chiseling or sanding. A template guides the router, defining the exact dimensions and location of the recess.
The controlled depth achievable with a bushing system prevents accidental plunge cuts that could damage the workpiece. This technique is particularly useful when working with figured woods or veneers where tear-out is a concern. Guide bushings allow cutters to be used in ways that are otherwise impossible, offering versatility and accuracy for hardware installation.
Inlay Work with Router Guide Bushings
Router guide bushings are invaluable for precise inlay work, allowing for clean and accurate cavities to be routed for intricate designs. Determining the correct bushing size is crucial for a perfect fit, requiring careful calculation based on the bit diameter and desired inlay dimensions. The bushing ensures the router follows the template exactly, creating a consistent recess for the inlay material.
This method simplifies complex inlay patterns, enabling single-pass routing for even elaborate shapes. It’s a preferred technique for achieving tight-fitting inlays, minimizing the need for hand-fitting or adjustments. Mastering guide bushing use unlocks a new level of detail and precision in your inlay projects, resulting in professional-quality results.
Sign Making with Specialized Bits
Router guide bushings expand sign-making possibilities, particularly when used with ball-nose or V-groove bits. These combinations allow for creating raised or recessed lettering and intricate designs with exceptional accuracy. The bushing ensures consistent depth and width of cuts, vital for professional-looking signage. While bearing bits offer simplicity, guide bushings provide greater control over the final shape and size, especially for complex fonts or logos.
Using a template and the appropriate bushing offset, you can replicate designs repeatedly, ensuring uniformity across multiple signs. This method is ideal for both small-scale and large-scale sign production, offering a balance of precision and efficiency. It’s a versatile technique for crafting unique and eye-catching signage.

Choosing the Right Guide Bushing Size
Selecting the correct size involves understanding bit and bushing offset calculations, ensuring accurate cuts that match your template’s dimensions for optimal project results.
Understanding Bit and Bushing Offset
The core concept behind router guide bushings is the offset – the distance between the edge of the bushing and the cutting edge of the router bit. Unlike bearing bits which cut directly on the template edge, bushings require calculating this offset to achieve the desired final dimensions. This offset is determined by both the bushing’s inner diameter and the router bit’s diameter.
Essentially, the bit cuts inside the bushing’s path. Therefore, your template must be adjusted to compensate for this offset. Accurate offset calculation is crucial; errors lead to undersized or oversized results. Many resources and online calculators assist in determining the correct offset based on your specific bushing and bit combination. Ignoring this fundamental principle will compromise the accuracy of your work, especially in precision projects like inlays or guitar building.
Calculating the Correct Bushing Size for Your Project
Determining the ideal guide bushing size involves considering the desired cut and the router bit being used. Start by defining the final dimensions of your project feature – for example, the size of a pickup cavity in a guitar. Then, factor in the bit’s radius. The formula is: Bushing Inner Diameter = (Desired Cut Width) + (Bit Radius x 2).
Alternatively, if you know the bit and bushing diameters, you can calculate the offset. Several online calculators simplify this process, eliminating manual calculations. Remember, selecting a bushing too large can limit maneuverability, while one too small might require multiple passes. Careful planning and accurate calculations are essential for achieving precise results with router guide bushings.
Common Bushing Sizes and Their Uses
Frequently utilized guide bushing sizes cater to diverse woodworking applications. A 1/2-inch bushing is versatile for general-purpose routing, offering a balance between accuracy and bit clearance. Smaller 3/8-inch bushings excel in intricate inlay work or tight corners, demanding precision. For larger recesses or edge profiling, a 3/4-inch bushing proves beneficial.
Self-centering bushings often come in sets with multiple insert sizes, providing adaptability. Specialized bushings, like those for pickup routing, are tailored for specific tasks. Choosing the right size depends on the bit diameter, template design, and desired cut. Understanding these common sizes streamlines project setup and enhances routing efficiency.

Using Router Guide Bushings: A Step-by-Step Guide
Achieving accurate results requires careful template creation, secure mounting, and controlled routing techniques, ensuring the bushing consistently follows the template’s path.
Template Creation and Material Selection
Creating a precise template is paramount when utilizing router guide bushings. Materials like MDF (Medium-Density Fiberboard) or acrylic are excellent choices due to their stability and smooth surfaces. The template’s accuracy directly translates to the routed piece, so meticulous construction is key.
Ensure the template is slightly oversized to accommodate the bushing offset; this is crucial for achieving the desired final dimensions. Securely fasten the template to your workpiece using double-sided tape or clamps, preventing any movement during routing. Consider the template’s thickness – it needs to be substantial enough to withstand the routing process without warping or damage. A well-crafted template is the foundation for successful and repeatable results with router guide bushings.
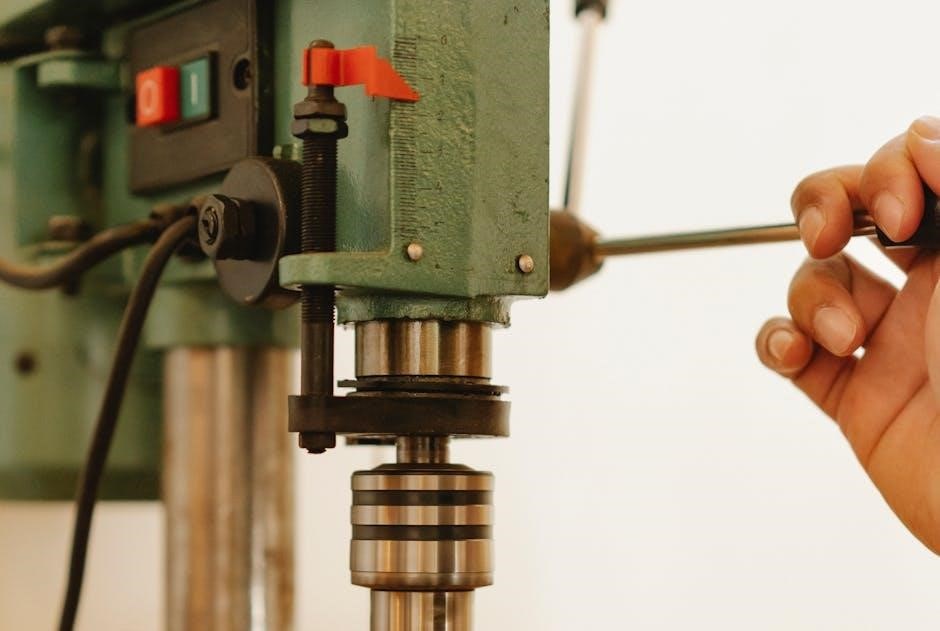
Mounting the Guide Bushing to Your Router
Proper mounting is essential for accurate routing with guide bushings. Most routers accept guide bushings via a collet adapter, replacing the standard collet. These adapters come in various sizes to accommodate different bushing outer diameters. Ensure the adapter is securely tightened to the router, preventing any wobble during operation.
The guide bushing itself typically attaches to the adapter with screws or a clamping mechanism. Double-check that the bushing is firmly fixed and aligned with the router’s spindle. A loose bushing will introduce inaccuracies into your cuts. Always refer to your router and bushing kit’s instructions for specific mounting procedures. A stable and correctly mounted bushing is the cornerstone of precision routing.
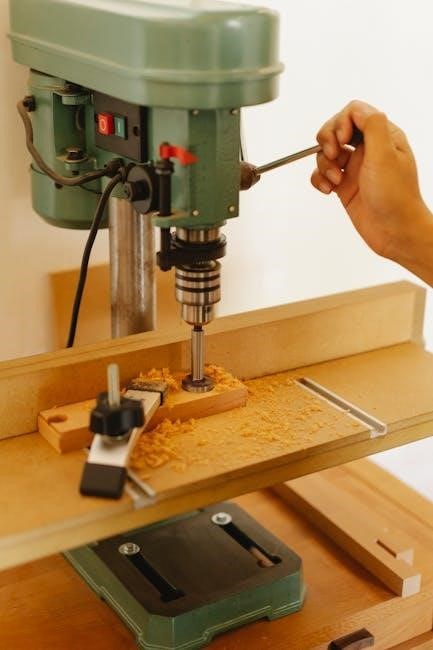
Securing the Template
A firmly secured template is paramount for achieving accurate results with router guide bushings. Movement during routing will ruin the cut, so employ robust fastening methods. Double-sided tape is suitable for lighter materials and initial positioning, but screws are generally preferred for greater stability, especially with hardwoods.
Ensure screws are placed strategically, avoiding the intended cut line. Consider using countersinking screws for a flush surface. For larger templates, multiple clamps can provide even pressure and prevent warping. Verify the template is completely flat against the workpiece before starting. A wobbly or shifting template negates the precision offered by the guide bushing system, leading to inaccurate and unsatisfactory outcomes.
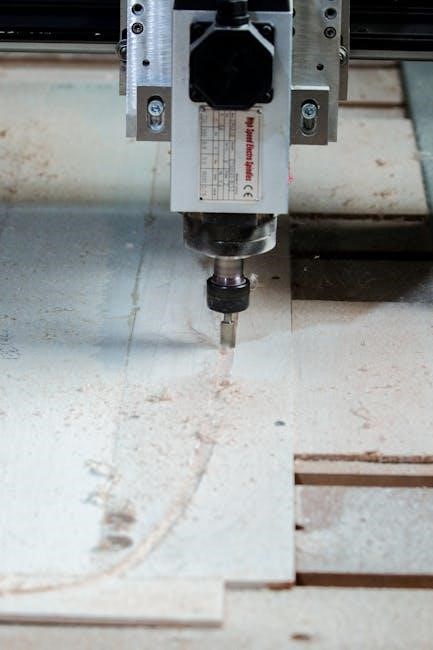
Routing Techniques for Accurate Results
Employ shallow passes when using a router with a guide bushing; avoid attempting to remove too much material in a single pass. This minimizes stress on the router and template, resulting in a cleaner, more accurate cut. Maintain a consistent feed rate – too fast can cause burning, while too slow can lead to chipping.
Climb cutting (feeding the router against the rotation of the bit) can sometimes produce a cleaner edge, but requires extra caution and control. Always prioritize safety and use appropriate dust collection. Multiple passes, gradually increasing depth, are often preferable to a single, deep cut. Remember to account for the bushing offset when visualizing the cut path.
Advantages and Disadvantages Compared to Bearing Bits
Guide bushings require offset calculations, unlike bearing bits which cut directly to the template size, but offer versatility with various bit types for complex projects.
Accuracy Considerations: Bushing Offset vs. Bearing Cut
Achieving accuracy with router guide bushings hinges on understanding the concept of offset. Unlike bearing-guided bits, which follow the template’s edge directly, bushings require calculating the distance between the bit and the bushing.
This offset is crucial; failing to account for it results in cuts larger or smaller than intended. Bearing bits simplify this, cutting precisely to the template’s dimension. However, bushings excel when bearing bits are unsuitable – for instance, with certain bit profiles or when deeper cuts are needed.

Precise template creation and accurate offset calculations are paramount when using guide bushings. Small errors in either can compound, leading to inaccuracies. Despite this, experienced woodworkers often prefer bushings for their control and adaptability.
When to Choose a Guide Bushing Over a Bearing Bit
Opt for router guide bushings when bearing bits fall short. Bushings unlock capabilities with bits like ball-nose or V-groove cutters, ideal for intricate sign making where bearing bits are impractical. They also excel in applications demanding complex pickup routs in a single pass, or creating shallow recesses for hardware – tasks often cumbersome with bearing bits.
Furthermore, bushings allow for cutter usage impossible with bearing guides. While bearing bits offer simplicity, bushings provide versatility. If you need to navigate internal corners or execute precise, repeatable cuts beyond a bearing bit’s reach, a guide bushing is the superior choice.
Consider bushings for projects requiring consistent offset and control, even if it demands a bit more mathematical planning.
Cost-Effectiveness of Guide Bushings
Router guide bushings present a remarkably cost-effective upgrade for any woodworking shop. Compared to acquiring a full set of bearing bits to cover various cut sizes and profiles, a single router and a selection of guide bushings offer greater flexibility at a lower overall investment. This is particularly true when considering specialized cuts or unique template designs.
The initial expense of a bushing kit is modest, and the bushings themselves are durable, offering long-term value. They allow you to maximize the utility of existing router bits, eliminating the need to constantly purchase new, specialized cutters.
For hobbyists and professionals alike, guide bushings deliver a high return on investment through increased precision and versatility.
Maintenance and Care of Router Guide Bushings
Router guide bushings require regular cleaning and inspection for wear; lubrication ensures smooth operation, while timely replacement maintains accuracy and prevents damage to workpieces.
Cleaning and Lubrication
Maintaining your router guide bushings through consistent cleaning and lubrication is crucial for optimal performance and longevity. After each use, thoroughly remove sawdust and debris with a soft brush or compressed air, preventing buildup that can impede smooth movement.
A light application of lubricant, such as silicone spray or specialized bushing lubricant, minimizes friction and ensures accurate routing. Avoid oil-based lubricants, as they can attract dust and create a gummy residue.

Apply the lubricant sparingly to the bushing’s inner and outer surfaces, then wipe away any excess. Regular lubrication not only enhances precision but also protects the bushing from corrosion and wear, extending its lifespan and maintaining consistent results in your woodworking projects.
Inspecting for Wear and Damage
Regularly inspecting your router guide bushings for signs of wear and damage is vital for maintaining accuracy and preventing project mishaps. Examine the bushing’s inner diameter for any ovalization or scoring, which indicates excessive wear. Check the outer surface for cracks, chips, or deformation that could affect its alignment with the template.
Pay close attention to the bushing’s mounting surface, ensuring it remains flat and free from damage. Any wobble or play during router operation signals potential issues.
Early detection of wear allows for timely replacement, preventing inaccurate cuts and ensuring continued precision in your woodworking. Ignoring these signs can lead to compromised results and potentially damage your workpiece or router.
Replacing Worn Bushings
When a router guide bushing shows significant wear or damage, replacement is crucial for maintaining accuracy. Begin by disconnecting the router from power. Carefully remove the old bushing, noting the mounting hardware – typically a screw or retaining ring. Ensure the replacement bushing is the correct size and type for your router and intended application.
Install the new bushing, tightening the mounting hardware securely but not excessively. Verify the bushing rotates smoothly and is firmly seated against the router base.
A properly installed replacement restores precision to your routing operations, preventing inaccuracies and ensuring clean, consistent results. Always refer to your router’s manual for specific replacement instructions.